The Ultimate Guide to Understanding Atom Board-Making: Uncovering the Answers in the Worksheet

Understanding the composition and structure of atoms is a fundamental concept in chemistry. The Atom Board is a popular educational tool used to teach students about atoms and their components. The Making Atoms worksheet is a valuable resource that provides practice and reinforcement for students as they learn about how atoms are built.
This article will provide the answers to the Atom Board: Making Atoms worksheet, guiding students through the process of building atoms using protons, neutrons, and electrons. By following the answers, students will deepen their understanding of atomic structure and gain hands-on experience in assembling atoms.
The Making Atoms worksheet consists of a series of questions and exercises that prompt students to determine the number of protons, neutrons, and electrons in various atoms. It also challenges students to identify the atomic symbol and mass number for each atom. The provided answers will serve as a helpful reference for students to check their work and ensure accuracy in their calculations.
The Atom Board-Making Atoms Worksheet Answers
As a part of the atom board-making atoms worksheet, students are required to answer a series of questions related to the composition and structure of atoms. These answers help them gain a deeper understanding of atomic structure and how different elements are formed.
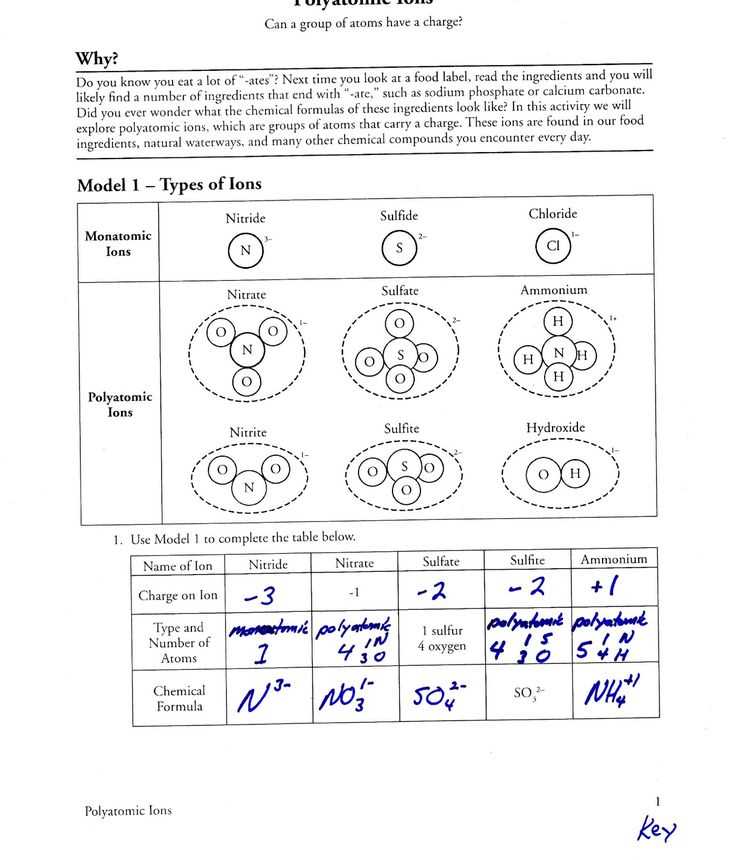
One question from the worksheet asks students to identify the number of protons, neutrons, and electrons in a given atom. Students need to refer to the periodic table to find the atomic number, which corresponds to the number of protons, and the atomic mass, which indicates the total number of protons and neutrons. By subtracting the number of protons from the atomic mass, students can determine the number of neutrons. Finally, the number of electrons is usually equal to the number of protons in a neutral atom.
In another question, students are asked to determine the element represented by a specific electron configuration. They need to understand the order of filling electron orbitals and the maximum number of electrons per energy level. By analyzing the electron configuration, students can identify the atomic number and look it up on the periodic table to determine the corresponding element.
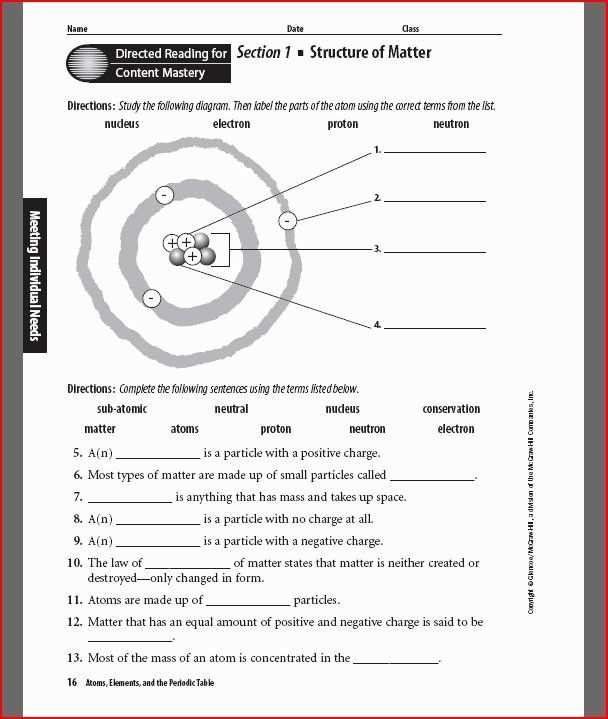
To further enhance their knowledge of atoms, students are also tasked with drawing atomic models. They need to correctly represent the nucleus, with protons and neutrons, surrounded by electron shells. The number of electrons in each shell depends on the specific element and its atomic number. By practicing drawing these models, students develop a visual understanding of atomic structure and learn to apply their knowledge in a hands-on way.
Overall, the Atom Board-Making Atoms Worksheet provides students with an opportunity to deepen their understanding of atoms, their composition, and electron configurations. By answering questions and drawing models, students engage with the material in a more interactive way, helping them solidify their knowledge and gain a stronger foundation in chemistry.
Importance of the Atom Board Activity
The Atom Board Activity is an essential tool for understanding the basic structure of atoms and their components. By engaging in this hands-on exercise, students are able to visualize and manipulate the different parts of an atom, including protons, neutrons, and electrons. This activity allows students to gain a deeper understanding of how these particles interact and determine the overall properties and behavior of atoms.
One of the key advantages of the Atom Board Activity is its ability to engage students in active learning. Rather than simply memorizing facts about atoms, students are actively involved in constructing and deconstructing atoms on the atom board. This hands-on approach stimulates critical thinking and problem-solving skills, as students are encouraged to experiment with different combinations of particles to create different atoms. This practical experience helps students to internalize the information and make connections between the abstract concept of atoms and the physical world around them.
The Atom Board Activity is also useful in reinforcing key scientific concepts and terminology. By physically placing protons, neutrons, and electrons on the atom board, students are able to see and understand how these particles are arranged within an atom. They are also able to grasp the concept of atomic number and mass, as well as the overall charge of an atom. This visual representation helps students to remember and recall these important facts, making their learning experience more effective and meaningful.
In addition to its educational benefits, the Atom Board Activity also fosters teamwork and collaboration. Students are often encouraged to work together in pairs or small groups to complete the activity, promoting communication and cooperation skills. This collaborative learning environment allows students to discuss and exchange ideas, helping them to develop a deeper understanding of the topic and learn from one another’s perspectives.
In conclusion, the Atom Board Activity is an invaluable tool for teaching and learning about atoms. Through hands-on manipulation and visualization, students are able to better comprehend the structure and properties of atoms, reinforce key scientific concepts, and enhance their critical thinking and teamwork skills. This activity is an engaging and effective way to deepen students’ understanding of the fundamental building blocks of matter.
How to Set Up the Atom Board
The Atom Board is a useful tool for teaching students about atoms and their components. By using this interactive worksheet, students can learn about the different parts of an atom and how they are organized. Here are the steps to set up the Atom Board in your classroom:
1. Prepare the Materials
Gather the necessary materials for the Atom Board activity. You will need:
- A large poster board or whiteboard
- Markers or colored pencils
- Index cards or small pieces of paper
- Adhesive putty or tape
Make sure you have enough materials for each student to have their own set.
2. Draw the Atom Board
On the poster board or whiteboard, draw a large circle in the center to represent the nucleus of the atom. This is where the protons and neutrons will be placed. Next, draw smaller circles around the nucleus to represent the electron shells. These shells will hold the electrons.
3. Label the Parts
Using the markers or colored pencils, label the nucleus with the letter “P” for protons and the letter “N” for neutrons. On the electron shells, label them with the numbers 1, 2, 3, etc. These numbers represent the different energy levels of the electrons.
4. Create Atom Cards
Write down the names of different elements on index cards or small pieces of paper. One element per card. These cards will represent the atoms that students will create on the Atom Board.
5. Attach the Atom Cards
Using adhesive putty or tape, attach the atom cards to the Atom Board. Place them randomly around the board so that each student can choose any atom to work with.
6. Start the Activity
With the Atom Board set up, students can now choose an atom card and begin creating that atom on the board. They can place the appropriate number of protons and neutrons in the nucleus and distribute the electrons on the electron shells according to the element’s atomic structure. Encourage students to use different colors to differentiate the parts of the atom.
By setting up the Atom Board in your classroom, you can provide students with a hands-on and visual way to learn about atoms and their components. This activity promotes active engagement and understanding of atomic structures.
Step-by-Step Instructions for Completing the Atom Board Worksheet
Completing the Atom Board worksheet is an engaging and interactive way for students to learn about the structure of atoms. This step-by-step guide will help students complete the worksheet successfully and gain a deeper understanding of atoms and their components.
Step 1: Start by carefully reading the instructions and questions provided on the Atom Board worksheet. Make sure you understand what is being asked before proceeding to the next step.
Step 2: Sketch the basic structure of an atom on the worksheet. Use a circle to represent the nucleus at the center of the atom and smaller circles to represent the electrons orbiting around it. Remember that the number of electrons should match the atomic number of the element.
Step 3: Next, fill in the blanks for the atomic number and atomic mass of the element you are working with. These values can be found on the periodic table or provided in the instructions. The atomic number corresponds to the number of protons in the nucleus, while the atomic mass is the sum of protons and neutrons.
Step 4: Now, determine the number of protons, neutrons, and electrons for the specific element. The atomic number tells us the number of protons, which is also equal to the number of electrons. The atomic mass minus the atomic number will give you the number of neutrons.
Step 5: Label the nucleus with the appropriate number of protons and neutrons. Use a different color or symbol for each to differentiate them. Place the electrons in their respective orbits around the nucleus, following the rules of electron configuration. The first orbit can hold a maximum of 2 electrons, while the second and third orbits can hold up to 8 electrons each.
Step 6: Double-check your work to ensure all the information is correctly represented on the Atom Board worksheet. Review the atomic number, atomic mass, number of protons, neutrons, and electrons. Make any necessary corrections before submitting the completed worksheet.
By following these step-by-step instructions, students will be able to complete the Atom Board worksheet accurately and effectively. This activity not only reinforces their knowledge of atomic structure but also encourages critical thinking and problem-solving skills.
Common Challenges and Solutions
When working on The Atom Board-Making Atoms worksheet, students may encounter several common challenges. However, with the right strategies and solutions, these challenges can be overcome.
- Limited knowledge of atomic structure: One of the main challenges students may face is a limited understanding of atomic structure. This can make it difficult for them to accurately complete the worksheet. To overcome this challenge, teachers can provide additional resources such as textbooks, videos, or online articles that explain the concepts in a clear and concise manner. Teachers can also encourage students to ask questions and seek help when they encounter difficulties.
- Difficulty in visualizing atoms: Another challenge students may face is difficulty in visualizing atoms and their components. Atoms are extremely small and cannot be directly observed, making it challenging for students to fully grasp their structure. To address this challenge, teachers can use interactive models or simulations to help students visualize atoms. They can also provide real-life examples and analogies to make the concept more relatable and easier to understand.
- Complexity of atomic notation: The atomic notation used in the worksheet can be complex and confusing for some students. Understanding the symbols, numbers, and subscripts requires a good understanding of the periodic table and atomic structure. To help students overcome this challenge, teachers can provide a brief review of atomic notation and periodic table basics. They can also provide examples and practice problems for students to reinforce their understanding.
- Lack of patience and attention to detail: Working on the worksheet requires patience and attention to detail. One small mistake in atomic notation or calculations can completely change the answer. Some students may rush through the worksheet or overlook important details, leading to incorrect answers. To address this challenge, teachers can emphasize the importance of careful reading and double-checking work. They can also encourage students to take their time and ask for help if they are unsure.
- Difficulty in identifying elements and their properties: The worksheet requires students to identify elements and determine their properties based on atomic notation. This can be challenging, especially for students who are not familiar with the periodic table. To help students overcome this challenge, teachers can provide a periodic table reference or guide. They can also organize in-class discussions or activities to help students become more familiar with the different elements and their properties.
In conclusion, while The Atom Board-Making Atoms worksheet may present some common challenges for students, these challenges can be overcome with the right strategies and solutions. By providing additional resources, encouraging visualization, clarifying atomic notation, promoting attention to detail, and improving element identification skills, teachers can help students successfully complete the worksheet and enhance their understanding of atoms and atomic structure.
Benefits of Using the Atom Board-Making Atoms Worksheet
The Atom Board-Making Atoms Worksheet is a valuable educational tool that offers several benefits to students learning about atoms and their structures. This interactive worksheet allows students to actively engage with the material and develop a deeper understanding of atomic concepts.
Visual Representation: One major benefit of using the Atom Board-Making Atoms Worksheet is that it provides students with a visual representation of atoms. The worksheet includes various elements that students can arrange and manipulate to create different atoms. By physically moving the elements around the board, students can visualize how atoms are formed and understand their structures better.
Hands-on Learning: The worksheet promotes hands-on learning, which is proven to be highly effective in improving student engagement and retention of information. By physically assembling atoms using the provided elements, students actively participate in their own learning process. This hands-on approach allows them to reinforce their understanding of atomic concepts and develop a stronger foundation in chemistry.
Concept Reinforcement: The Atom Board-Making Atoms Worksheet is designed to reinforce key concepts related to atoms. By arranging the elements according to the atomic structure, students gain a practical understanding of the organization of protons, neutrons, and electrons within an atom. This reinforcement of concepts helps students grasp the fundamental principles of atomic structure more effectively.
Critical Thinking Skills: Using the Atom Board-Making Atoms Worksheet encourages students to develop critical thinking skills. As they assemble atoms, students must consider the number and arrangement of protons, neutrons, and electrons to create a stable atom. This process requires them to analyze and evaluate different options, fostering their critical thinking abilities.
Collaborative Learning: The Atom Board-Making Atoms Worksheet can also be used as a collaborative learning tool. Students can work in pairs or small groups to discuss and compare their findings, promoting cooperative learning and peer-to-peer interactions. This collaborative approach enhances students’ comprehension of atomic concepts and allows them to learn from their peers.
Overall, the Atom Board-Making Atoms Worksheet offers numerous benefits in teaching and learning about atoms. Its visual representation, hands-on learning approach, concept reinforcement, development of critical thinking skills, and collaborative learning opportunities make it an effective educational tool for students studying atomic structure.
Additional Resources for Teaching Atomic Structure
Teaching atomic structure can be challenging, especially for younger students who may have difficulty understanding complex scientific concepts. However, there are several resources available that can help educators engage their students and make the topic more accessible. Whether you’re looking for videos, interactive activities, or printable worksheets, the following resources can supplement your lessons and reinforce students’ understanding of atomic structure.
1. Khan Academy
Khan Academy offers a comprehensive collection of video lessons and practice exercises for teaching atomic structure. The site breaks down the topic into manageable sections, allowing students to master one concept before moving on to the next. The videos use clear and concise explanations, making them suitable for learners of all ages.
2. PhET Interactive Simulations
PhET Interactive Simulations provides a range of interactive simulations that allow students to explore atomic structure and other chemistry concepts in a hands-on manner. These simulations engage students in virtual experiments and help them visualize the behavior of atoms and molecules. The website also offers accompanying lesson plans and worksheets for educators.
3. The Atom Board-Making Atoms Worksheet Answers
The Atom Board-Making Atoms Worksheet Answers is a valuable resource for assessing students’ understanding of atomic structure. This worksheet provides answers to the atom board activity, allowing educators to check students’ work and provide feedback. It can be used as a formative assessment tool to gauge students’ comprehension and identify areas that need further instruction.
4. Periodic Table Apps
Periodic table apps offer an interactive and engaging way for students to explore the elements and their atomic structure. Apps such as Chemist, Elements: The Periodic Table, and The Elements by Theodore Gray provide detailed information about each element, including their atomic number, atomic mass, electron configuration, and other properties. These apps can help students visualize the periodic table and its organization, making it easier to understand atomic structure.
5. Virtual Chemistry Labs
Virtual chemistry labs allow students to conduct experiments and explore atomic structure in a virtual environment. Websites like ChemCollective and Virtual Chemistry offer a variety of simulations and virtual lab activities that cover topics such as electron configuration, atomic models, and bonding. These virtual labs provide a safe and accessible way for students to practice their skills and deepen their understanding of atomic structure.
By incorporating these additional resources into your teaching, you can enhance your students’ learning experiences and make atomic structure more engaging and accessible. Whether you choose to use videos, interactive simulations, printable worksheets, or virtual labs, these resources can help your students grasp the fundamental concepts of atomic structure and develop a deeper appreciation for the microscopic world.